Wednesday, 28 February 2018

Tilda LemonTree Fabric - Blog Hop

Tilda have a new collection out, called LemonTree.  I was lucky enough to be sent some fabric from SewandSew, in order to take part in this blog hop showcasing the pretty new designs.

I partook in a similar blog hop a couple of years ago - but I prefer this new range, as it's a little bit brighter and more cheery!  That would follow, as this is a Spring release and that was an Autumn release - and Spring colours are more me!

This is the selection I was sent...

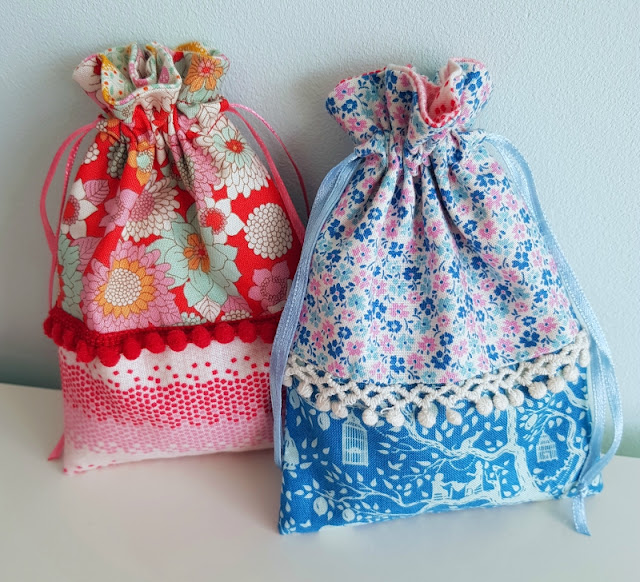
Cute little drawstring bags made with Tilda Lemontree fabric

I decided to make a couple of cute little drawstring bags, and used a bit of all the fabric except for the purple and green one at the bottom.  I think I needed other fabrics from the range to coordinate well with that one.

Cute little drawstring bags made with Tilda Lemontree fabric

The pattern I used was from A Spoonful of Sugar but without the lace motifs.

I love the pompom trim I used on the red one!

Cute little drawstring bags made with Tilda Lemontree fabric

The lining is the second to bottom fabric in my top picture, which is so pretty - I need to make another project which shows it off more!

Cute little drawstring bags made with Tilda Lemontree fabric

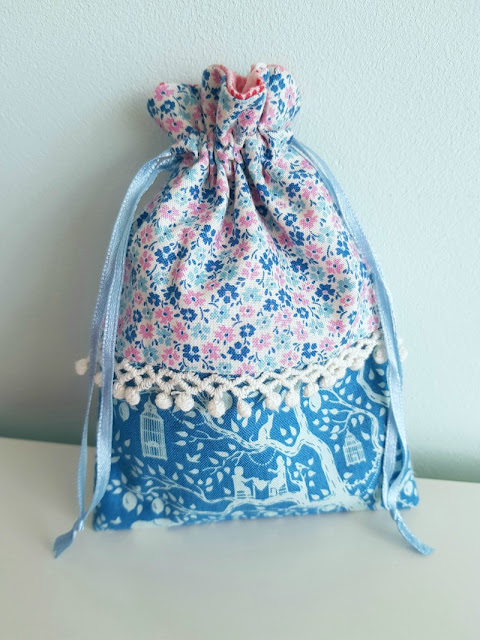
The blues are pretty too... the bottom fabric is so gorgeously whimsical...

Cute little drawstring bags made with Tilda Lemontree fabric

I lined it with one of the fabrics I used for the outer of the red bag, positioned vertically rather than horizontally...

Cute little drawstring bags made with Tilda Lemontree fabric

I think I'm going to use them to hold gifts - it would be lovely to receive a piece of jewellery presented in a pretty bag like this!

Cute little drawstring bags made with Tilda Lemontree fabric

You can visit the other crafters taking part in the blog hop, using the links below - lots of lovely ideas and inspiration!

Monday 19th February – SewandSo
Tuesday 20th February – Little Black Duck
Wednesday 21st February – Vicky Myers Creations
Thursday 22nd February – Tea and a Sewing Machine
Monday 26th February – Helen Philipps
Tuesday 27th February – Strawberry Patch Ramblings
Wednesday 28th February – Dinki Dots
Friday 2nd March – Just Jude Designs


Check out my sewing projects here.


Like what you see?  Follow me on bloglovin!


Sunday, 25 February 2018

Tilda Fabric!

Do you like Tilda fabric?  I've been sewing with the new collection from Tilda - LemonTree!

Tilda's new fabric collection - LemonTree

Check back on Wednesday, to see what I've made!


See my sewing projects here.


Like what you see?  Follow me on bloglovin!


Sunday, 18 February 2018

Completed Crochet Colour Blocks

I've been working on them since April last year, but I have now finally finished my 12 crochet colour blocks!


They are each about 29cm x 29cm, which is fairly big.  I love the bright zingy colours - gorgeous King Cole Bamboo Cotton which is one of my favourites.

I've had the colours and layout planned out in an excel spreadsheet - and they will all be joined together in the arrangement shown below...


Bright colourful crochet colour block squares - to be made into a blanket.

I have a dark navy to border and join each square, and hopefully make the bright colours pop... not that they need much help in that respect!  I thought it would be a good contrast and enhancement for all that brightness.


Bright colourful crochet colour block squares - to be made into a blanket.

The plan is to complete three rounds of navy around each square, joining as I go.  I will then do a few rounds around the whole piece - depending on how much yarn I've got left!  I'm very excited to see this come together!!


Check out my completed crochet items here.


Like what you see?  Follow me on bloglovin!

Sunday, 11 February 2018

Pattern Cutting and Garment Construction - Weeks 3, 4 and 5

I've not been keeping up with my updates on my clothes making course, so I am grouping lessons 3, 4 and 5 together.  We're now half way through the course!  There will be a week's break for half term, then 5 more weeks to go.

I have now created a mini body with collar!

Find out all about sewing a shirt with collar, sleeve and cuff!

This is all just practise work, with cheap thin calico material, just to learn the skills we need.  This is why it's not full length, to conserve material, as it was the collar we were focused on.

Find out all about sewing a shirt with collar, sleeve and cuff!

This was made using the pattern pieces we created in week 2.  I won't try to explain how you sew the collar on the shirt, as I couldn't get my head around it until we actually did it.  However, I'm pretty proud of how it turned out - it's quite neat!  (It is even and equal as well - it's just hard to get it to behave for a photograph!)

Even though it hasn't been made to anyone's size - it was just using whatever blocks we happened to grab when we drew out the pattern on paper - I thought I'd try it on, just for fun...!

Find out all about sewing a shirt with collar, sleeve and cuff!

It makes me feel like I might be able to make myself a shirt that I can actually wear!

We then went on to start to make a sleeve with cuff and slit.  We drew up our pattern pieces (again - the arm was made shorter to conserve material).  My cuff was measured wrong somehow, so I shortened it when I was making it with the fabric - so it wasn't as long as the paper pattern piece in the end.

Find out all about sewing a shirt with collar, sleeve and cuff!

That little bit of pattern piece is the cuff slit facing.  That was a fun new skill!  You cut that little rectangle of fabric and interfacing.  You sew it to the sleeve, where you want your slit to be, with your stitching going a couple of millimetres to one side of the centre line, then angling to a point a little bit down from the top, then coming back down a couple of millimetre to the other side of the centre line.  You then cut up the middle, between the stitches, as close to the point as possible without snipping it.  You turn the facing round on itself (again - something I couldn't get my head around until I saw it!) and you end up with a nice need slit!

Find out all about sewing a shirt with collar, sleeve and cuff!

The sleeve/cuff slit came out really well actually - I'm not sure how!

The cuff gets sewn on it pretty much the same way as the collar.  There is an overlap as you can see above, for the fastening.  I don't think we are bothering with the fastening on these practise pieces.  My cuff isn't quite finished - one half of the folded fabric is sewn on, but I need to do another line of stitching around to catch the other half of the fabric which is on the inside.  I also need to sew the sleeve into the body piece.

I'm not sure if we will be continuing with that in our next lesson, or cracking on with our main wearable garment!  It feels like completing our final piece in the 5 weeks we have left is going to be tricky!

I am really pleased with how much I've been learning, though.  I'm so glad I decided to take the course!

You can read my other posts on the course here:

Week 1
Week 2


Check out my sewing projects here.


Like what you see?  Follow me on bloglovin!


Friday, 2 February 2018

Completed Knitted Shawl!

Yay - I have finished my knitted shawl!  I bought the pattern and yarn when I went to the Knitting and Stitching Show in October and pretty much started it straight away.  It's taken a few months, but I haven't worked solidly on it - I've been working on other things inbetween.

Beautiful hand knitted shawl in hand-dyed yarn.

The shawl has a garter stitch border around it, to stop the curling you get with stocking stitch.  However, I did find that it still wanted to curl, so it made blocking necessary.  I didn't actually take any photos before or during blocking - sorry.

Beautiful hand knitted shawl in hand-dyed yarn.

I don't know about you, but I find blocking such a pain!  I'm too impatient, and don't want to wait!  I knew I had to do it, though.  I pinned it all out and thought I'd try steam blocking, which I haven't done before.  I heated up my iron and pressed the steam button to puff steam out all over the shawl.  I don't actually think that's the right way to do it - I definitely did something wrong, as it didn't work!  When I felt the shawl, it didn't feel very damp - but I left it for a few hours to see what would happen.  When I had unpinned half the shawl, it curled up straight away.

Ah well!  I pinned it back down again and squirted water from a spray bottle all over the knitted fabric.  I left it a couple of days to dry before unpinning, and that had done the trick!  I'm not much of an expert on blocking (clearly) but I do wonder if I should have soaked it completely before pinning out.  I thought that it would take forever to dry, though.  Hmmm, who knows - maybe something to experiment with in the future.

Beautiful hand knitted shawl in hand-dyed yarn.

Although I dislike actually doing any blocking, I love the finished effect!  It is always so worth it!  The fabric drapes so much better and the curling is gone.  The effort always pays off.

The pictures in the pattern showed the picots around the edge more defined and 'pointy' than mine.  I could have pulled them all out with pins as I blocked the shawl, but I actually preferred the way they looked as they were - a bit of a softer look - so I specifically avoided pulling the points as I pinned.

Beautiful hand knitted shawl in hand-dyed yarn.

Quite a pleasing first finished item of 2018, I'd say!  I'm hoping for many more finished creations this year - last year was pretty sparse.

Beautiful hand knitted shawl in hand-dyed yarn.


The Details
The yarn is For the Love of Yarn in the colourway 'Fun at the Fair' - in fingering weight.
The pattern is 'Knit Me' by Inspiration Knits.
4mm circular needles used.


Check out my (very few) completed knitted projects here.


Like what you see?  Follow me on bloglovin!

Related Posts Plugin for WordPress, Blogger...