Monday 18 June 2018

Wedding Signs, Sweetie Bag Labels and a Decorative Tree

Isn't that a catchy title?!  This is the last of my wedding craft related posts - phew!  I've grouped the outstanding bits into this post, and then we'll hear no more about it!

*I've linked to the products I used - if they've got an asterix then they are an affiliate link.  If not, then they're not.  You don't pay anything more for using an affiliate link - I would just get a few pennies if you did buy anything.  (I think I would, anyway - I wouldn't really know as I've never earned anything so far, in the very very rare times I've tried using an affiliate link!  But that's fine by me - I'm just a hobby blogger!)

I made a couple of signs for the wedding.  One to go with the guest book...

Wedding Guest Book Sign

I printed on the same hammered card I used for all the rest of my wedding crafting (hard to see the texture in the photo, but it made it look a little fancier!) and put it in a box frame with a gold bow.

Wedding Guest Book Sign

The gold bow picked up the gold on the guest book and the pens.  I made crepe paper peonies to go with them as a bit of extra decoration.

Links to items:
Pen 1 *


The other sign was for the sweet table...

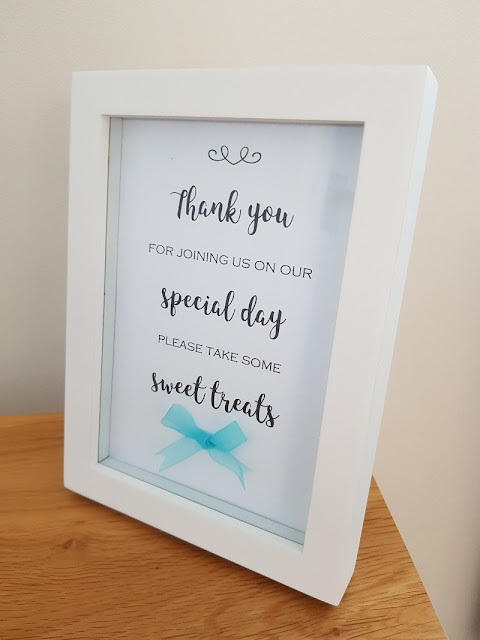
Wedding Sweet Table Sign

This was the same style box frame as the other one.  I just had these at home - bought from Homebase years ago.  I printed on the hammered card again and used an aqua bow this time - that matched all the place names and menus.  The colour scheme of the wedding was aqua with touches of pink and a bit of gold.

Wedding Sweet Table Sign and Paper Sweet Bags with Cute Labels

I made labels for the sweetie bags.  I ordered the bags from Amazon - links below - and designed my own labels that I printed off and stuck on.


Wedding Sweet Table Sign and Paper Sweet Bags with Cute Labels

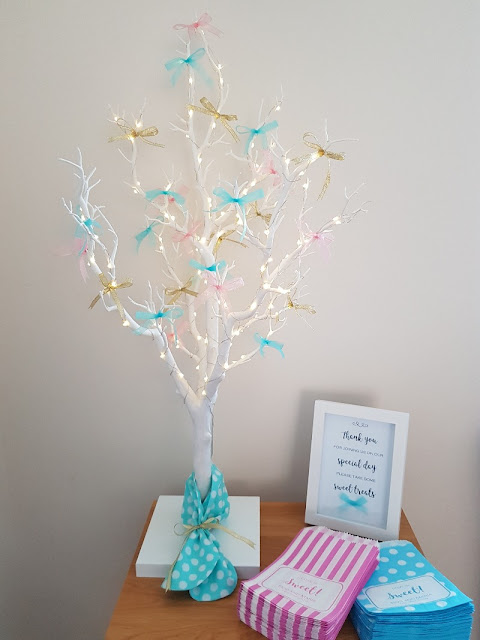
And finally, I decorated a white decorative tree with aqua, pink and gold bows that I made from ribbon.  I firstly wrapped it in tiny wire fairy lights, that I already had from a couple of Christmases ago.

Wedding Sweet Table Sign and Paper Sweet Bags with Cute Labels

This went on the sweet table too.

Aqua Ribbon (I think it's this one - I bought it in store)
The pink and gold ribbon was also from Hobbycraft, but I'm not sure which ones.

Here was the sweet table on the day...

Wedding Sweet Table Sign and Paper Sweet Bags with Cute Labels
Photo by LJ Photographics

I don't think the lights on the tree were switched on yet - as they were only put on when the evening guests arrived and the sweet table was made available to all!

Links to:
Sweet Jars * (they were plastic)
Sweet Tongs - I bought them from ebay, but the seller appears to have been removed from ebay!  There are plenty on Amazon, though - like these * which look the same as the ones I bought.

And I do believe that is it on the Wedding crafting front!


Check out more of my wedding crafting here. 


Like what you see?  Follow me on bloglovin!


Saturday 9 June 2018

DIY Wedding Place Names and Menus

Are you bored of posts related to wedding crafting yet?!  Sorry if you are - I have been working on a long-standing crochet blanket project... so there will be other crafting to show you!

However, before my wedding is old news, I wanted to document the things I made for it.  I thought it might give ideas for anyone planning a wedding - as well as something I can look back on in future years!

Click to find out how to make gorgeous DIY wedding place names and menus!

I made all the place names for my wedding - 98 of them!  (Well, actually 100 as two guests couldn't make it and I found out in the nick of time to replace them with two others!)

I used this card* (*affiliate link) which is a lovely lightly hammered card.  It's hard to see the texture in my pictures, but it looked great in real life.  I was worried whether it would go through the printer ok - but I had no problems at all.  The print on the card was also nice and crisp and black - a better finish than on normal paper, I found.

Click to find out how to make gorgeous DIY wedding place names and menus!

I liked the idea of going for something a little different to the usual place names I'd seen - which were mostly landscape rather than portrait (wider rather than taller).

I also wanted to put everyone's menu choices on the back.  I know when I attend anything I usually forget what I ordered, so it's nice to have a reminder!  It also helped the catering staff when handing out the food.

Click to find out how to make gorgeous DIY wedding place names and menus!

The way I made these was to use Word to create a table with five columns - each column made one place name.

Click to find out how to make gorgeous DIY wedding place names and menus!

Each column was 5.2cm wide and each row (there were two rows) was 7.25 cm high.  (You might need to reduce the margins to fit that on the page - and make sure the last column hasn't been cut smaller if it doesn't fit on the page.)

I presented the names in the same way for all guests - with the script font for their first names and the other font for their surnames.  For Rob and me, the script was on the bottom - for 'Bride' and 'Groom'.

For the menu choices, I added a text box and formatted it so that the text was upside down.  This meant that once printed and folded, the menu choices were the right way up.

I altered the table lines to a pale grey, so that I could see them when I printed them out - but when cut you wouldn't be able to really tell that there were any lines there.

Once one page was ready, I copied the table onto as many pages as I needed and amended the names and menu choices - that took a while!!  I'd do it in stages, a few a day!

I cut them all out with a guillotine, then folded along the middle line.  Make sure you don't cut across the middle line - as then you're cutting the place names in half - yes, I did that once!!  Very annoying!

Once cut out and folded, it was "just" a matter of tying a length of aqua organza ribbon around the front of each place name.  I cut my ribbon to 32 cm lengths, snipped out a 'V' on each end, then tied a bow around the top front of each place name.  The bows drove me mad!!!  Trying to get them even and looking good was quite tricky!  If you don't mind wasting ribbon you could cut longer lengths, tie your bow, then snip off the ends to make the legs of the bow the same length.  I thought doing that for so many place names, I would end up wasting way too much ribbon, so I did it the hard way!

Here are ours on the big day!

Click to find out how to make gorgeous DIY wedding place names and menus!
Photo by LJ Photographics

The menu choices on the place names were abbreviations of the full description, so I created a menu for each table with all the options.

Click to find out how to make gorgeous DIY wedding place names and menus!

I made 11 of these - one for each table.  I used the same hammered card, and this time made a table in Word with three columns, each 9.05cm wide.  There was only one row, and it was the height of the page.  I used the same font as the place names to type up the menu, copied it onto each column, and printed the page out as many times as I needed.

I cut them out with the guillotine, tied (yet more!) bows and stuck them to the bottom with glue dots.

A couple of shots from the day...

Click to find out how to make gorgeous DIY wedding place names and menus!
Photo by LJ Photographics

Click to find out how to make gorgeous DIY wedding place names and menus!
Photo by LJ Photographics

What do you think?  Would you consider making your own place names and menus for your wedding?


Check out more of my wedding crafting here. 


Like what you see?  Follow me on bloglovin!


Thursday 7 June 2018

DIY Crate Wedding Table Plan

We are now back from a wonderful honeymoon in Mauritius!  So... here is another wedding craft post for you!

I made my own Table Plan for the wedding, using a crate we received from my sister-in-law (who was my bridesmaid) as a hamper full of goodies when we got engaged.


How to make your own vintage crate wedding table plan - cute and easy!

I turned it on it's side and decorated the top with crepe paper peonies.  I made others for the wedding too, and you can find out all about how I made them and what I used here.

Once the flowers were in place, I wrapped two lengths of gold ribbon around the crate, tying them tightly at the back.

Now... the slight rough edges of the box, along with the glittery texture of the ribbon, meant that the ribbon didn't slip or move at all - it gripped well.  If you were using a more silky slippy ribbon, you would probably want to use some hot glue, glue dots, or something similar to make your ribbon stay in place.

I printed each table's number and guests onto hammered white card, and cut them out.  To fasten them to the ribbon, I used a glue dot at the top of the card and pressed it to the back of the ribbon, positioning the cards evenly across the length.  I then added the mini pegs, which gave a bit of extra fastening security, as well as looking pretty!


How to make your own vintage crate wedding table plan - cute and easy!

I hot-glue-gunned pink and aqua bows to the table plan, for some extra decoration.

Then to finish off I used a beautiful frame which I already had at home - it is a Matthew Williamson one, from Debenhams.  For inside that frame I used the hammered card again and printed our names, the date of the wedding and the top table list.

It was all quite simple, but I was pleased with how it looked.


How to make your own vintage crate wedding table plan - cute and easy!


How to make your own vintage crate wedding table plan - cute and easy!


Check out more of my wedding crafting here. 


Like what you see?  Follow me on bloglovin!


Related Posts Plugin for WordPress, Blogger...