Friday 23 March 2018

Peek-a-Boo Crochet Baby Blanket - Complete!

Sorry for the silence lately - time is just whizzing by!  Rob and I have been on our stag and hen weekends - much fun... then recovery... was had!

It feels like the wedding in May is careering towards us - eeek!  I'm experiencing a sense of being very busy with wedding planning, although I'm not sure what I'm actually doing that's taking up so much time.  Thinking about it, it's more the head-space it's taking.  The awareness that this big event is looming and we have to get everything in order for it.  It's not like I'm spending every minute doing wedding related things - far from it.  I guess it's just always on my mind, which makes me feel busy with it!

Anyway - back to the point of this post... my completed Peek-a-Boo blanket!  I showed it to you here without a border.  My friend has now had her baby, and it was a little girl, so I have been able to crochet the border of the blanket.  I have gone with pretty pinks!

A beautiful cute little crochet baby blanket - quick and easy to make.  Click to find out more!

I love it!  I wanted to use pink for the border, as I think it looks so good with the duck egg / aqua colour, so I was pleased she had a little girl!  (I know, I could have used pink for a boy too - let's not go into the whole gender colour debate - I just probably wouldn't have done.)

A beautiful cute little crochet baby blanket - quick and easy to make.  Click to find out more!

I love it so much!!  As I said when talking about the blanket previously, I've wanted to make this blanket since it first came out - years ago!

The aqua colour is such a difficult colour to photograph - I have no idea why it's so troublesome.  You can see in the other posts I've linked to in this post, that it seems to look different in nearly every photo!  I am pleased that the colours in this final post have actually come up the closest to reality!

A beautiful cute little crochet baby blanket - quick and easy to make.  Click to find out more!

I can't wait to hand this over and meet my friends gorgeous little baby now!

Details

Pattern: Peek-a-Boo Blanket by Sandra Paul - Size: Small Baby Blanket
Yarn:
  Main colour: Sirdar Snuggly in Choo Choo Train (419) x 5 balls
  Border: Sirdar Sunggly in Precious (187) (darker pink) x 1 ball
              Sirdar Snuggly in Pearly Pink (302) (lighter pink) x 1 ball 
Hook: 5mm (I'm a tight crocheter - pattern calls for 4mm)
Measurements: 72cm x 87cm (smaller than the measurements in the pattern due to my tight tension - I really need to loosen up!)


What do you think - isn't it so pretty?!  (Even if I say so myself!!)


Check out my completed crochet items here.


Like what you see?  Follow me on bloglovin!


Sunday 4 March 2018

DIY Doily Confetti Cones Tutorial

I've been doing some wedding crafting!  I wondered whether I should keep some details secret, and only share them after the wedding... but then I thought "nah!"


Looking to make your own DIY confetti cones?  Here is a great tutorial for cute, cheap and easy doily confetti cones!

I will show you how I made them... it's very easy!  And best of all, I had all the supplies to make the cones already!  I had bought the doilies years ago with ideas of wrapping things in brown paper with doilies and bakers twine - luckily I barely used them!

1 - Gather your supplies:

  • doilies - mine are 30cm diameter
  • double sided tape
  • scissors (to cut the tape)

Looking to make your own DIY confetti cones?  Here is a great tutorial for cute, cheap and easy doily confetti cones!

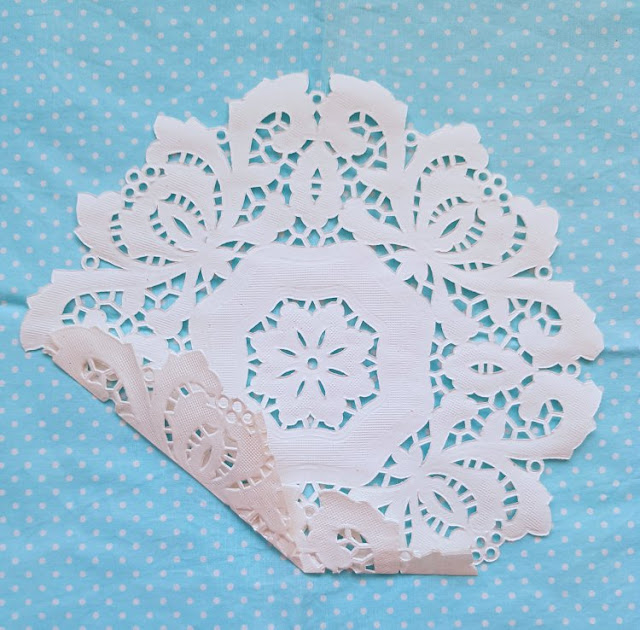
2 - Use two doilies together, for a bit of strength - they tend to stick together anyway.  Fold the bottom of the doilies up by about 3cm:


Looking to make your own DIY confetti cones?  Here is a great tutorial for cute, cheap and easy doily confetti cones!

3 - Fold the left hand side in, from the middle point at the bottom to the middle point on the left hand side:


Looking to make your own DIY confetti cones?  Here is a great tutorial for cute, cheap and easy doily confetti cones!

4 - Cut small squares of the double sided tape and place along the diagonal folded edge, removing the backing.  (I took a photo of this, but you couldn't really see the tape, so I didn't include it.)

5 - Roll from the right hand side, making a point at the middle of the bottom edge, where your diagonal fold starts, rolling round, then sticking your taped edge down:


Looking to make your own DIY confetti cones?  Here is a great tutorial for cute, cheap and easy doily confetti cones!

Your doily confetti cone is complete!  Make as many as you need... I've made 50!


Looking to make your own DIY confetti cones?  Here is a great tutorial for cute, cheap and easy doily confetti cones!

When you are ready, fill with the confetti of your choosing.  I found some dried petal confetti on ebay...


Looking to make your own DIY confetti cones?  Here is a great tutorial for cute, cheap and easy doily confetti cones!

This was only filled for these photos, though - I'm going to leave the petals in their plastic bag, in a dark place, to try to keep them looking and smelling their best for the wedding day in May.  I'll fill them nearer the time - but making the cones themselves is a task that is good to do in advance.  Another thing ticked off the list!


Looking to make your own DIY confetti cones?  Here is a great tutorial for cute, cheap and easy doily confetti cones!

You could also add little embellishments to the cones, like an adhesive bow.  I haven't decided whether to do that yet, or not.


Looking to make your own DIY confetti cones?  Here is a great tutorial for cute, cheap and easy doily confetti cones!

My next challenge is what to put them all in, to hold them on the day!

UPDATE SINCE THE WEDDING:

Here are the photographer's shots of them at the wedding... showing how I chose to display them... I used a round tray from Tiger in a pale bluey colour - it was only £5!

Looking to make your own DIY confetti cones? Here is a great tutorial for cute, cheap and easy doily confetti cones!
Photo by LJ Photographics

Looking to make your own DIY confetti cones? Here is a great tutorial for cute, cheap and easy doily confetti cones!
Photo by LJ Photographics


Check out more of my wedding crafting here.


Like what you see?  Follow me on bloglovin!

Related Posts Plugin for WordPress, Blogger...