Sunday, 29 January 2017

Crochet Finger Sloth

I follow Alia @thelittlebeenz on Instagram and saw the most adorable little sloth on her feed in December.  I knew I had to make one!  Luckily, despite the rush of Christmas, Alia worked on and released the pattern for this cute little guy which I snapped up straight away!

Finally I have had the time to get to work on one...


I have a friend whose daughter is mad about sloths.  I find that amigurumi can take me forever (as in the case of Gary the Snail!) so had shied away from committing to make a sloth in the past.  But a finger sloth!!!  The mini size made it much more manageable and most importantly... finishable!


I love how these finger sloths are designed to be bright and colourful too... it makes it more fun to work on than it would have been in more accurate browns!  Much better!!


Looks like the finger sloth and the monkey are getting on well...!


Details
Pattern:  Finger Sloth by TheLittleBeeNZ
Hook Size:  4.5mm (due to my tight tension)
Yarn:  A mix of King Cole CottonSoft DK and King Cole Bamboo Cotton DK


So that's yet another completed amigurumi creature - my first finished item of 2017!  For someone who doesn't really enjoy the making part of amigurumi I seem to make a lot!  But they are so cute!!
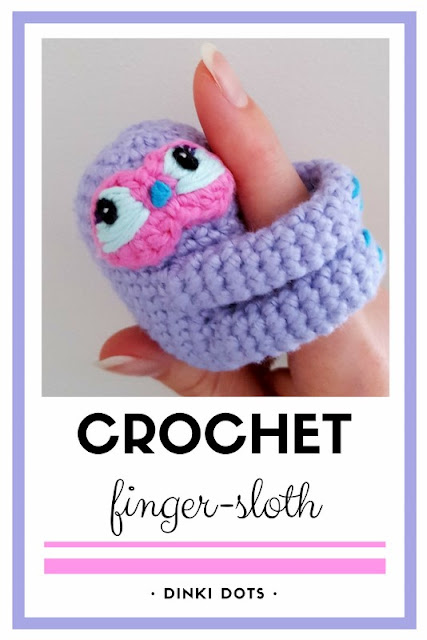
Crochet Finger Sloth


Check out my completed crochet items here.


Like what you see?  Follow me on bloglovin!


Sunday, 22 January 2017

Stripy Blanket - Two-Thirds Through

I've been meaning to update you on the progress of my Stripy Blanket for ages... as it is at the two-thirds through stage (and has been for some time, oops) and I thought I'd take the opportunity to share it.

Why two-thirds through is that significant, I don't know - but I've decided it should be marked in some way.  It also means I can tell you a bit more about it, as I have never actually given any yarn information, despite sharing peeks of it in the past (such as in my most viewed ever post!)  Yes, I started it over three years ago... there is no excuse for not finishing it by now!

Looking for inspiration and ideas for a cute and easy stripy crochet blanket?  This is made in calm blue and green stripes, for a restful ocean feel.  Click to find out more details on the yarn and pattern used!

The yarn I'm using is King Cole Cottonsoft DK, which is such a lovely soft yarn to work with, with a 5mm hook (instead of the 4mm recommended, as I have tight tension).  You can buy the yarn at Love Crafts*.

The colours are:

White (710)
Sky (714)
Mint (715)
Saxe (718)
Jade (781)

Looking for inspiration and ideas for a cute and easy stripy crochet blanket?  This is made in calm blue and green stripes, for a restful ocean feel.  Click to find out more details on the yarn and pattern used!

Above you can see all thirty completed stripes of colour.  I plan to do fifteen more.

Current measurements are:

Width: 128cm / 50 inches
Length: 108cm / 42.5 inches (which will presumably grow by half again if (WHEN!) finished)

It's going to be a big one!

Looking for inspiration and ideas for a cute and easy stripy crochet blanket?  This is made in calm blue and green stripes, for a restful ocean feel.  Click to find out more details on the yarn and pattern used!

The pattern is a very simple - just rows and rows of double crochet (UK treble crochet) in a seemingly random pattern.  (It's not random, of course - I have it carefully planned in a spreadsheet!!)

The good thing with stripes is that the blanket becomes a blanket on its own, so to speak.  There is no pile of squares that are useless (apart from eye-candy purposes, that is) until sewn or crocheted together.  Even though it's not finished, I've been able to cosy under it for ages - so that makes up a little for my extremely slow and lazy approach to finishing it, surely?!

However, I do hope that I'll be able to show-off the completed blanket at some point this year.  But don't hold your breath!


*affiliate link


Check out crochet items that I have actually managed to finish here.


Like what you see?  Follow me on bloglovin!


Sunday, 15 January 2017

Stabby Granny

You know when you just want to try something, for no particular reason and with no end project in mind?

This is what happened here...


It's a "Stabby Granny", a fun and funky granny square from Set Free My Gypsy Soul and Make.E - you can find the pattern here.

Mine is a bit twisted, which is a common issue with granny squares.  I think some blocking would sort it out, if I decide to actually use it for anything.

I really like the stabby design - the way the colours almost seem to bleed into each other.  It's created with spike stitches and I love the effect it gives, especially in these blues.  When I saw the pattern I could picture it in these gorgeous colours from my stash, which is why I had to drop everything and try it out.  I just love different blues together!

There are a couple of specific patterns to go with the stabby granny design - a cowl or fingerless gloves - but my square is a lot smaller than it should be for those patterns (without adding extra rows).  My yarn is DK, rather than the aran recommended, and I have tight tension.  (I used a 5mm hook, rather than the 4mm recommended on the yarn, or the 4.5mm recommended in the pattern, and my square measures approx 12 to 13cm across.)

I didn't really have a project in mind, anyway - I just wanted to see the square in these colours!  But now I'm thinking maybe I should try to make something... but what?  Not a big project, like a blanket, but a small quicker one - any ideas?!


Check out my completed crochet items here.


Like what you see?  Follow me on bloglovin!


Friday, 6 January 2017

Creation Consolidation - 2016!

Hello and happy new year to you!

The past few years I've enjoyed putting together a post consolidating all my makes from the year.  It's nice to see everything in one place, so without further ado here are my 2016 creations!

Click on the title of the picture to be taken to the relevant post.

Crochet Gloves (with fingers)


Stripy Crochet Baby Blanket


Chunky Knit-Look Crochet Cowl


Tapestry Crochet Mobile Phone Case


Squares for 'Jenny's Blanket of Hugs'


Tissue Paper Pom-Poms


Tilda Fabric Zip Pouch


Tilda Fabric Strawberries


Tilda Fabric Trinket Tray


Crochet Snail


Decorated Gift Box


Crochet Elephant


Crochet Snowflakes


Crochet Christmas Baubles (with free pattern!)


Crochet Santa Cushion


Christmas Gift Can


Crochet Gary the Snail (from SpongeBob SquarePants)


Crochet Pokeball


Phew, I started slow but certainly ramped up as the year went on!

If you are interested, here are my consolidation posts from previous years:

2013
2014
2015

I didn't do a round-up for previous years, but you can see other finished items at the below links:


Here's to a great 2017 for us all, and lots more crafting!


Like what you see?  Follow me on bloglovin!

Saturday, 31 December 2016

Crochet Pokeball

Just time to share one last make this year!

As a little birthday present for my nephew, I made him a fun little Pokeball...


It's just a small one, as you can see!

I made it by crocheting one half of a ball in red, finishing with a row of black.  Then another half of a ball in white, finishing with a row of black.  The two halves were sewn together with black yarn, and stuffed as I went.

I can't quite remember how I did the middle circle!  I think it was twelve dc or hdc (US) / twelve tr or htr (UK) into a magic ring, in white.  Then two sc (US) / dc (UK) into each stitch in black.  Then I sewed it to the ball.  Sorry to be a bit vague on that - I made it as I went along and didn't make notes!

Anyway, happy new year!  I hope 2017 is a craft-filled year for us all!


Check out my crochet items here.


Like what you see?  Follow me on bloglovin!


Wednesday, 28 December 2016

Crochet Gary the Snail

This project has been a long time coming!  I started it back in the summer as a little gift for my nephew.  Well, I only finished it just in time for it to be a Christmas present!


Crochet Gary the Snail from SpongeBob SquarePants

Remember a while back, I made this snail for my sister-in-law?  She suggested one in the colours of Gary the Snail from SpongeBob SquarePants for my nephew, as he loves Gary.  She sent me a picture, as I didn't know the character, but I decided that the shape of the other crochet snail just wasn't right for Gary.

I thought there was bound to be a pattern online for him, but I really struggled to find one so in the end I made it up as I went along.  Hence why it took me so long as I had a fair few struggles and ripping it back along the way!  But now he's finally done, I think he looks quite like the image my sister-in-law sent me, don't you think?


Crochet Gary the Snail from SpongeBob SquarePants

It wasn't feasible to make the eye stalks as thin as the cartoon version, not with crocheting them and wanting them to stand up.  I actually crocheted around a turquoise pipe cleaner to make them, which means they can be bent and moved around which is a good feature.


Crochet Gary the Snail from SpongeBob SquarePants

Crochet Gary the Snail from SpongeBob SquarePants

Crochet Gary the Snail from SpongeBob SquarePants

Now he's finally done, I'm quite pleased with him.  He's a little wonky I think, and not perfect, but I hope he looks like Gary!

What do you think - do you like him?!


Crochet Gary the Snail from SpongeBob SquarePants

Crochet Gary the Snail from SpongeBob SquarePants


Check out my crochet items here.


Like what you see?  Follow me on bloglovin!


Monday, 26 December 2016

Christmas Gift Can

Merry Christmas!  I hope you're all having a lovely festive time!

Here is a little Christmassy make to show you.  I've had this idea pinned for ages, but I finally got round to having a go this Christmas.


It's such a fun idea!

You use a tab-top tin can - in my case, this was a chopped tomatoes tin - and you open it with a tin opener from the bottom, leaving it slightly attached.  This means that the top with the tab opener remains intact.  I used the contents to make my dinner and washed and dried the can thoroughly.

I took the label off as neatly as possible, so that I could use it as a template to cut out my Christmassy paper for the new festive covering.


Very simple to do - cut out your paper and stick one edge to the tin with double-sided tape.  Wrap the paper round and stick the other edge down in the same way.

I used a strip of sparkly fabric tape that matched the paper, to cover the seam.


I cut a circle of coordinating paper and cut a wedge out of it, so that I could slip it under the tab and secure it to the lid.  (I slipped more paper under the wedge at the top of the tab so that you can't really notice the missing wedge.)


My favourite bit was using pink and alphabet beads to make the message - "pull my tab" - which I attached to the tab, followed by ribbon tied in a bow.


Then I filled it with a little gift for my sister-in-law for Christmas.  You could put sweets in, or other small goodies.

The tricky part was re-attaching the bottom of the tin using a hot glue gun.  Where I'd opened it with a tin-opener, it was now smaller than the tin circumference.  I managed to get it to stick, but it was a bit of a gluey mess, so I covered it in a circle of felt and another circle of paper matching the top.  That neatened it all up at the bottom, and my Christmas gift can was done!


Like what you see?  Follow me on bloglovin!


Saturday, 24 December 2016

A Crochet Hook-Up - Part 2

Back in October, I took part in another Crochet Hook-Up on Instagram, organised by Lazy Daisy Jones using #ldjcrchethookup.  You can follow me on Instagram here.

As with the last one, I like to share the images here too, for those of my readers who don't use Instagram, but might like to see the pretty pictures!  I'll split them into two posts, as there are quite a lot of images - this is the second post, find the first one here.


A photo posted by Maria (@dinki_dots) on


A photo posted by Maria (@dinki_dots) on


Sorry it took me so long to show them here on the blog.  I hope you all have a lovely Christmas - I have a couple of crafty makes to show you once they have been given to their recipients, so watch this space!


Like what you see?  Follow me on bloglovin!


Friday, 23 December 2016

A Crochet Hook-Up - Part 1

Back in October, I took part in another Crochet Hook-Up on Instagram, organised by Lazy Daisy Jones using #ldjcrchethookup.  You can follow me on Instagram here.

As with the last one, I like to share the images here too, for those of my readers who don't use Instagram, but might like to see the pretty pictures!  I'll split them into two posts, as there are quite a lot of images.


I hope you enjoy them.  Look out for Part 2 tomorrow!


Like what you see?  Follow me on bloglovin!

Related Posts Plugin for WordPress, Blogger...