Monday 31 December 2018

Felt Star Christmas Decoration

I thought I'd quickly get one last post in this year!  This is a new tradition I have started... to make a Christmas tree decoration every year.  I thought I'd start this year, as it's our first year as a married couple and our first year in our new house.  It seemed a good time to start!

Cute and easy felt star Christmas decoration for your tree.

I had been thinking of doing it, but didn't get round to it until the afternoon of Christmas Eve.  Because I'd left it so late, I just wanted something that I could whip up pretty quickly.

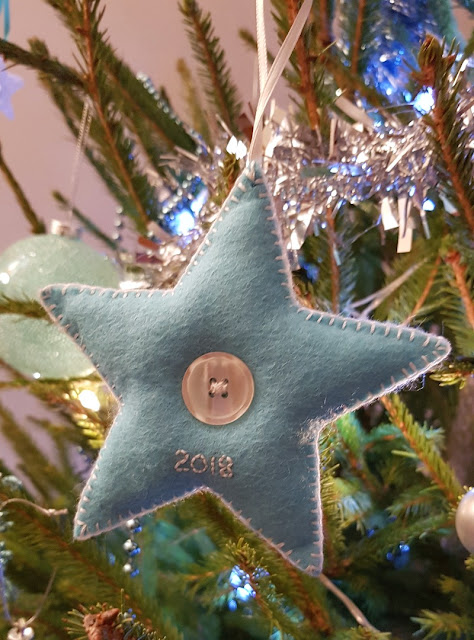
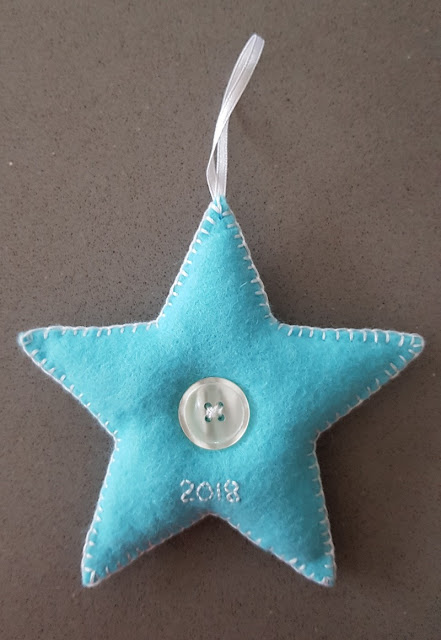
Therefore I went for a simple star.  I cut two star shapes out of aqua felt, using a plastic star template I had hanging around my craft room.

Cute and easy felt star Christmas decoration for your tree.

I sewed them together using blanket stitch and 4 strands of white embroidery thread.  (I think it was 4 strands anyway, I've already gone a little vague!)

I lightly stuffed the star just before finishing the blanket stitch, and then sewed a button on both sides through the middle, to add a bit of interest and emphasise the padded look.

Cute and easy felt star Christmas decoration for your tree.

Before sewing together, I embroidered the year on the back - which I plan to do with every decoration I make each year.  I also sewed the hanging loop of ribbon to the inside of the back piece, before sewing together.

It was up on the tree after dark on Christmas Eve...

Cute and easy felt star Christmas decoration for your tree.
Front

Cute and easy felt star Christmas decoration for your tree.
Back

I'm glad I managed to start this tradition in the nick of time.  I hope to do something a bit more elaborate next year... although the baby is due in May, so I have no idea how much time or motivation I'll have for crafting!  The tradition might start and end this year!


Like what you see?  Follow me on bloglovin!

Saturday 15 December 2018

Origami Paper Baubles

Well, it's been a while!  Things have been very busy here...

A few days after my last post, we got a happy positive result on a pregnancy test - I am now nearly 20 weeks pregnant!  Very exciting!

We also moved house in the second half of October, which kept us busy packing up the old house and trying to get sorted here in the new house.  We still have a way to go!

As well as that, I went through a 30 day collective consultation at work throughout November, but am relieved to report that I managed to keep my job.  Not everyone was as lucky, unfortunately, so it's been a strange time at work.

With all that going on, I have not achieved much in the way of crafting.  However, while unpacking my craft room last weekend, I found some origami paper and was instantly inspired to abandon my unpacking and create some paper baubles I'd seen on Pinterest!

Make these cute origami paper baubles!

You can find the pin here.  I prefer the baubles from the pin - the paper is gorgeous!  But I was just using what I had, and it was fun anyway!

I started with a blue one...

Make these cute origami paper baubles!

Then had to try a couple more colours...

Make these cute origami paper baubles!

You use two squares of paper - one for the top, one for the bottom.  They're actually not really origami, as you have to make a couple of cuts, and you stick the two halves together.  I'm sure it has another name, but I don't know what it is!

Make these cute origami paper baubles!

I then dug out some Christmassy scrap-booking/card-making paper squares I had.  These two were the result...

Make these cute origami paper baubles!

I love that paper on the right!!  It was my favourite when I used it in card-making years ago, and this bauble has finished the last couple of sheets.  I just love that funky spin on the traditional Christmas colours.

The Christmas paper was thicker than my origami paper, which I think gave a better finish, as it got less crumpled during the very fiddly part of sticking the two halves together.  The folding is easy - it's that sticking which is a tricky little blighter!  Although, the folds in corners are a bit neater on the thinner paper as doing a tight fold on thicker paper is more tricky.  All in all, though, I think they look pretty good!  What do you think?

Hopefully I won't leave it so long before my next post - I need to get busy creating... I've got a couple of things near to completion... and I'll have to fit some baby makes in!


Like what you see?  Follow me on bloglovin!


Related Posts Plugin for WordPress, Blogger...