Saturday 19 May 2018

Mint to Be - Wedding Tic Tac Label

I am now a married woman!!!  Who'd've thought it?!  Our wedding day was yesterday and it all went wonderfully!  I'm too exhausted to do much other than get everything packed and ready for the honeymoon (and that's only because we have to!) but I'd already written this wedding craft blog post, so thought I'd publish it today... here goes... (Incidentally neither of us actually ate a single Tic Tac throughout the day!  I'm putting mine in my hand-luggage bag, though, so it might get used yet!)

As a little bit of fun, I made a few pretty Tic Tac labels for the wedding.

I bought a pack of four boxes of Tic Tacs, and removed the labels from them.  That was a bit tricky as they were quite sticky - I heated them with a hairdryer to help the process along!

I then created a quick label design which I printed onto label paper.  The labels on the paper were bigger than I needed, but I just cut my label designs out once printed.  In case you are interested, the label I created was 2.9cm x 9.45cm.

On one side, I put...

Cute mint to be tic tac labels for wedding gifts or favours

On the other side...


Cute mint to be tic tac labels for wedding gifts or favours

The 'Mint to be' idea was something I'd spotted all over Pinterest, and thought it was quite cute.  Some people use this idea for favours, but we didn't have favours - instead opting for a sweet table.  I made these because I decided to put a box of Tic Tacs in the handbags of my bridesmaid and me - to keep us minty fresh throughout the day!  I then got struck with the creative urge to have a bit of fun with them... as if I didn't have enough to do!


Cute mint to be tic tac labels for wedding gifts or favours

I made four because there were four boxes in the pack - the other two I gave to my parents.  They weren't manly enough for Rob to take one!  ;)


Cute mint to be tic tac labels for wedding gifts or favours

I thought it was a nice thing to have in my bridesmaid's bag, alongside a little pocket mirror that I bought from a seller on Etsy.


Cute mint to be tic tac labels for wedding gifts or favours

The mirror was from here.


Check out more of my wedding crafting here. 


Like what you see?  Follow me on bloglovin!


Wednesday 9 May 2018

Crochet Colour Block Blanket

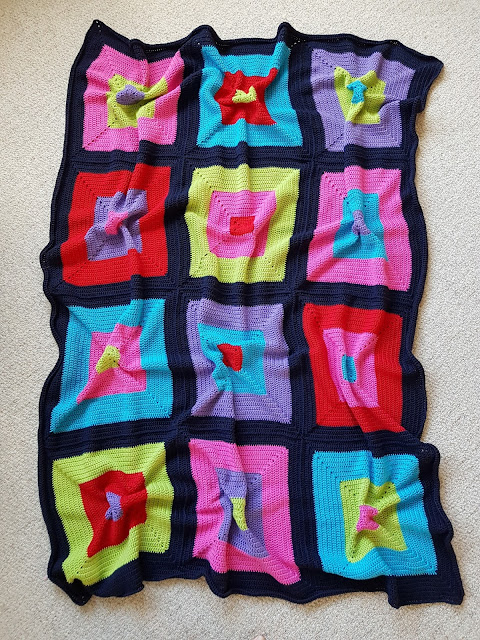
Finally it's done - just in time for this sunny weather!!

Click to find out more about this easy bright crochet colour block blanket.

A very bright and colourful crochet colour block blanket!

I started this in April 2017, so it's been over a year in the making... which isn't bad for me when it comes to making an adult size blanket!

Click to find out more about this easy bright crochet colour block blanket.

Details
Dimensions: 110cm x 151cm approx
Yarn: King Cole Bamboo Cotton in:

  • 531 Peacock - 2 100g balls
  • 536 Fuchsia - 2 100g balls
  • 533 Green - 2 100g balls
  • 544 Red - 2 100g balls
  • Violet (discontinued) - 2 100g balls
  • 542 Navy - 5 100g balls
I really like the finish of King Cole Bamboo Cotton - it's got a nice sheen and a lovely smooth finish, which enhances the vibrancy of the colours.


Click to find out more about this easy bright crochet colour block blanket.

It's hard to get a decent photo of it lying flat on the floor, as it ends up looking wonky and wobbly and I lost interest in pulling and straightening it!

It's a lot straighter than it looks in this picture.  Although the edges are curling over for some reason, which isn't something I'm used to with crochet.  It was all double crochet (UK treble crochet) but I finished the blanket with one round of crab stitch.  I'm not too bothered about the curling edges to be honest - I could try to block it but I don't think it's worth it.  You can see from the second picture of it draped over the chair, that it all hangs and sits nicely enough.

Click to find out more about this easy bright crochet colour block blanket.

I absolutely love it - it's just how I wanted it to look!  I love how bright it is, and how the navy really sets off the colour blocks.

I might write up the pattern for it if anyone is interested?  It's not that tricky really - just solid granny squares.  It'll be more of a method, than a pattern.

This has already been claimed by Rob.  In recent months he suddenly started asking when I was going to finish "his" blanket!  Well, I'm pretty pleased by that - he's not usually that taken by any of my creations!  It's done just in time to be a wedding present for him!!  ;)


Check out my completed crochet items here.


Like what you see?  Follow me on bloglovin!


Tuesday 1 May 2018

Wedding Reserved Signs

As I keep banging on about... I'm getting married soon.  Now that we have ticked over to May, it is in fact this month!!

I decided to make some little reserved signs to be placed on the chairs of the wedding party - to save their seats for the ceremony


How to make these cute reserved signs for your wedding!

I made these for the parents, and also one for my bridesmaid and one for the best man.

The inspiration for these was this pin which takes you to this page.  They have a downloadable template, which I didn't use.  I copied their design and made my own, using my wedding fonts.  I can claim no credit for these, though - they were a complete copy of the inspiration.


How to make these cute reserved signs for your wedding!

I used hammered white card, pink ribbons, and aqua eyelets.  I plan for them to be placed on the seats of the chairs.

They were just a bit of fun really - I saw the inspiration on Pinterest and felt like making them!

I have now created a page on my blog with links to all the things I've made for the wedding... you can find it here if you are interested.


Like what you see?  Follow me on bloglovin!


Related Posts Plugin for WordPress, Blogger...